

Introduction
A lot of the things in this tutorial, I have learned from reading books, some of them I have learned from THE art god and the guy who taught me a lot of what I know. This section is dedicated to him. I'm going to keep his name anonymous, but I am going to refer to him as B.D.S. Now, my loyal reader, I am going to pass these secrets down to you!
Before you get started, I have a few tips.
Don't be afraid to draw big and fill up the entire page. Many new artists like to draw small, and by doing this, they are missing out on a lot because it is much easier to add detail to large pictures. You bought the paper, so fill up the page and get the most out of your money.
Draw lightly. Light lines are easier to erase.
Don't be afraid to experament and use your imagination.
Don't get frustrated if your drawing dosen't turn out exactly the way you want it to. Great art takes time and patience.
Most importantly, have fun!
Tools Of The Trade
I recommend a few different tools to use. These items are not expensive, and are what I have found to be the best.
A mechanical pencil... preferably one that the lead dosen't move around a lot. I prefer mechanical pencils because they are ALWAYS sharp so you don't have to get up and sharpen them every two minutes.
Mechanical Pencil Lead. I recommend an "S" lead because it leaves lighter lines. A darker lead like "HB" is harder to erase and will leave unwanted lines.
Computer or typing paper. I don't like using sketchbooks because they are too soft and computer paper has a nice, smooth, easy to erase surface.
Magic Rub Eraser. These are the best erasers, and they are really cheap. They will take pretty much any pencil marks off your paper. You can find them at an office store like Staples.
Pens to ink your finished piece (optional). I use a brand called "Micron Pigma". They are a disposable art pen that comes in a variety of different sizes... and to save money, I will refill the pen with plain old India Ink. You can probably find these at an art supply store.
Something to color your piece (optional). I do most of my coloring digitally, but some nice real-media coloring are colored pencils, watercolor, colored inks, and paint.
Using Guildlines
Before you add major detail to your picture, first sketch out the of the drawing with simpler shapes very lightly. For example, if I wanted to draw a cat head, I would start out with a circle with a cross in the middle of it. This will help to align the cat's facial features. This may sound confusing, which is why I left all guidelines on the drawings in this tutorial as a reference.
Using Photographs as a Reference
I'm not saying copy a photograph. I'm just saying to use it as a reference. For example, when I was creating my Alexander character, I wanted to base him off of Mark Tremonti, Creed's guitarist. Why? Because Mark is sexy, dammit! ...and I am THE Creed fanatic, so I wanted to somehow add the band to my comic book. I decided to turn him into a ram because he looks like one.
So I start out with a picture of Mark...

... and I decide what features of his I am going to keep. His goatee is his trademark feature, so I am definately going to keep that. I also like his big ears (complete w/ earrings), brown eyes. Recently, he has shaved his head, but I prefer him with his spiky hairstyle.
And I take a picture of a ram.
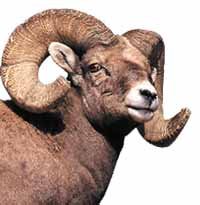
There are certain features of the ram that I am not going to like after the transformation. I'm going to give him a more horse-like noze and take out the white around the mouth the keep his muzzle simple. Those details will make him look funny because of his goatee. I'm also going to spread his horns apart a little more so there is room for his hair.
A little sketching, a little tweaking, And Viola!
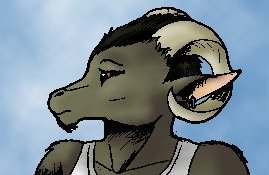
It's Alexander... or at least a profile of him. I don't have any good 3/4 angle pictures of him. Hopefully I'll have one soon.
The moral of the story... photographs can give you a good reference for drawing! This also helps if you are trying to find new body positions or backgrounds.
Books That May Be of Use to You
These are all books that I own and find very helpful.
"Anatomy for the Artist" - Jeno Barcsay
"Drawing Comics the Marvel Way" - Stan Lee
"Drawing The Head and Figure" - Jack Hamm
"Monstrous Manual" - Advanced Dungeons and Dragons
Thanks To...
I'd like to take a moment to thank the following people. These were the people who were my wings when I couldn't fly. If it wasn't for them, I don't think I'd be half the artist that I am today.
John. My soulmate. There were many times that I wanted to give up drawing, but he wouldn't let me.
The almighty art god ( B.D.S.). A million thanks to him. He taught me most of everything I know.
Laura and Anna who give me a neverending supply of laughter, the music of the soul. Who would have guessed that our college days would be filled with pizza orgasms and visions of shangralah.
Mrs. Wilson, my High School art teacher who believed in me.
